
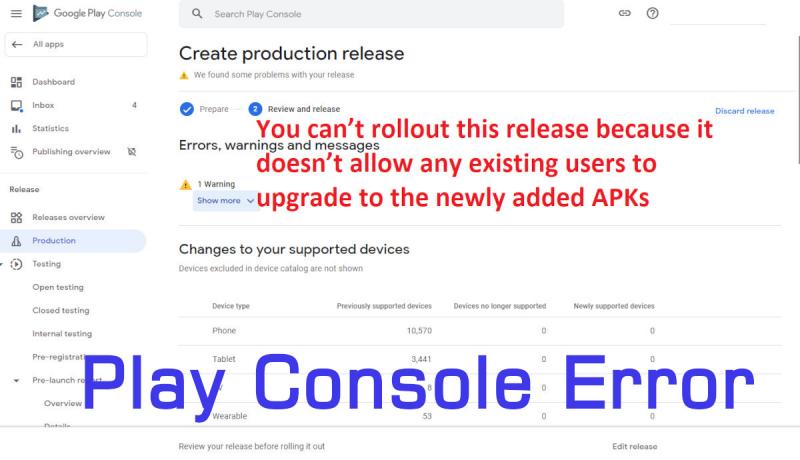
It is common for an Android Developer to upload new versions of an existing app in the Play-Console. If you do not follow versioning properly, you may get errors like "You can’t rollout this release because it doesn’t allow any existing users to upgrade to the newly added APKs". Let us know how to solve this.
How to Solve Play Console Error You can't Rollout This Release
This Rollout error occurs mainly due to two main reasons. Let us know the scenarios and solve this error next.
- Adding or Removing support for Extra Devices like Wear
- Using the wrong Version Code
Solution 1: Removing support for extra or new devices:
At the time of adding new activities to the app or project, you should select the template that goes compatible with the remaining activities. If you select the wrong template, the Android Studio adds XML code in Android-Manifest (AndroidManifest.xml) file to support the extra devices like WearOS. Even if you delete the activity, this additional code is not getting deleted.
You will get the Rollout errors at the time of uploading. So, create the new activities carefully to avoid this type of error.
Solution 2: Using the Correct Version Code:
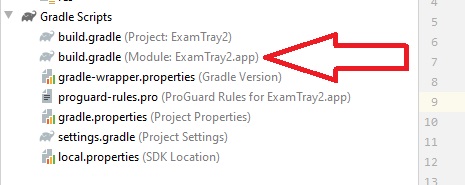
There will be two Gradle files present in every Android Project. One build.gradle is present at the Project Level and another build.gradle is present at the App Level.
Follow the below steps to update the Version Code.
Step 1: Open build.gradle file at App-Level or Module-Level.
Step 2: Under "android" and under "defaultConfig" add the below two lines of code containing versionCode and versionName.
android
{
  defaultConfig
  {
    versionCode 2
    versionName '2.0'
    // applicationId "PackageName"
    // minSdkVersion 24
    // targetSdkVersion 20
  }
}
For a new app created using the Android Studio, the default value of version code will be 1. Notice that it is an integer without decimal values. The versionName is kept for formality and it does not throw any error even if you update wrongly.
Step 3: If your existing Version Code is different, just add 1 or any number to that old number. You can put 10 as your next version number for example directly. It should be incremental in nature telling the Play Store that a new version of the App Bundle or App APK file is being uploaded.
Step 4: You can skip the above 3 steps and simply update the same in the settings screen of the Project or App Module. Simply right-click on the APP or Project and find the option "Open Module Settings" and click.

Step 5: You can see the below screen with Version Code, Version Name, Application ID, Minimum SDK Version, Target SDK Version and others. Just increment the Version Code and Click OK.

Step 6: Now try generating the App Bundles or APKs as usual with the same Key.
Step 7: Now upload the newly generated distribution file (.aab or .apk) in Google Play Console. You can successfully complete the Release Process.
Step 8: Your app will be published after some time after an automatic or manual review by Google Team.
This is how you can solve the play console error "You can’t rollout this release because it doesn’t allow any existing users to upgrade to the newly added APKs".
It is time to Share this Android Tutorial with your friends and colleagues.