

Java is almost a mandatory learning computer programming language by any engineering or diploma student. Learning Java, in fact, is the starting point of becoming a successful Android developer. Java is used in many electronic equipments like ATMs, Blue Ray Drives, Android Phones, Android Smart Wear, Games, Financial Application for Banks, Embedded Systems and others. Students find installing Java is difficult for the first time. It is easy to setup Java Environment in Windows 10 after following this tutorial.
Setup Java Environment in Windows 10 or Install Java Manually
To setup Java Environment in Windows 10 or older Windows operating systems, you need to download Java from Oracle website and Install it in the computer. There are two variations of Java.
- JDK or Java SE ( Java Standard Edition )
- JRE ( Java Runtime Environment )
1. Java SE
Java SE installs both JDK and JRE. JDK is Java Developer Kit. If you are developing Java applications, you need to compile the java programs. Hence JDK is the right option to install in this case.
2. JRE
JRE is useful only to run Java Applications but not for development works. Some websites force users to install JRE in order to display customized information that is displayed only on Java Supported (Or installed) browsers. If you do not develop any java programs or software, just install JRE on your machine.
Setting up Java Environment in Windows is nothing but adding Java Installation Path to Operating System Variables. It is called Setting Up Java Home.
There are two path variables to be set up in a Windows 10 Computer.
- Setup JAVA_HOME or Java Home Directory - To access JDK, JRE Tools
- Setup CLASSPATH or Class Path - To attach or add Libraries and Helper Classes
1. Setting Up Java Home or Java_Home Path
Step 1
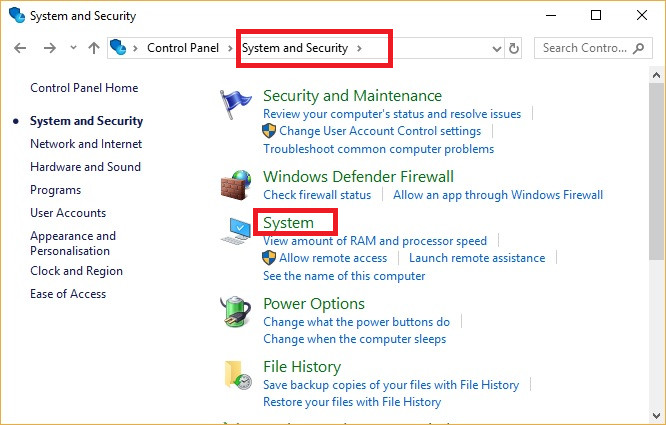
Open Control Panel. Go to System & Security. Open System.
or
Right Click on My Computer and goto Properties.
Step 2
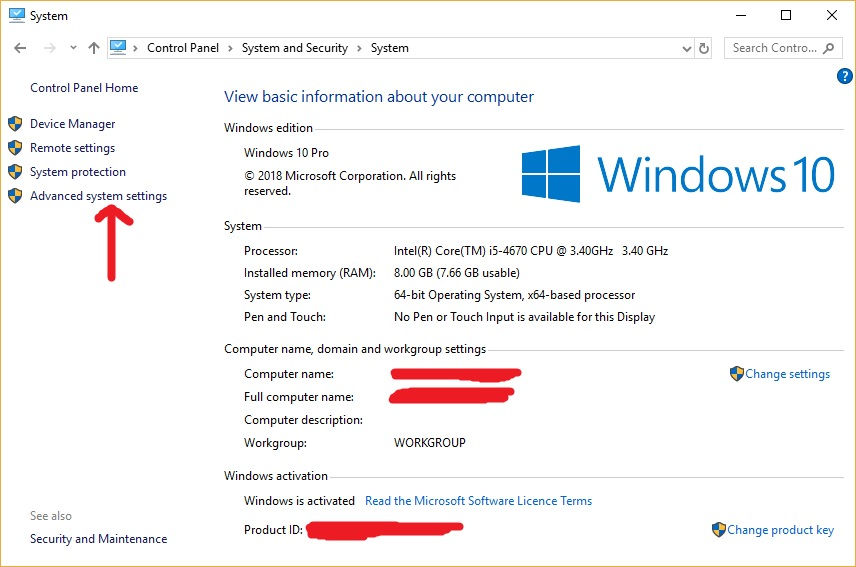
Here you can see your computer hardware specifications like RAM, Processor Type and Windows Activation status etc. Go to Advanced System Settings on the left side.
Step 3
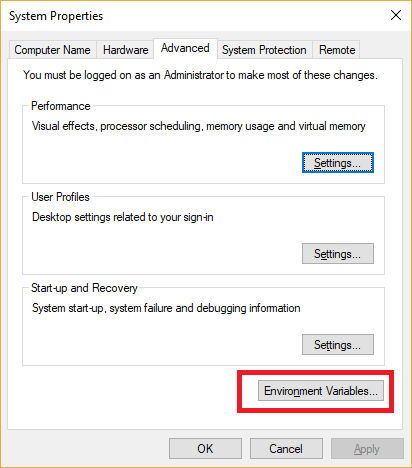
Under system properties, go to Advanced Tab. On the bottom, you can find a button with name 'Environment Variables..'. Just click.
Step 4
Under Environment Variables, you can see two sections. The top section shows User variables and the bottom section shows System Variables. In either of them, find for Variable name PATH or path. If it is not available click New on any section and add PATH as variable NAME and Value as C:\Program Files\Java\jdk1.8.0_131\bin for example.
If the PATH variable is already existing in any section, simply click Edit and add the Java Installation Path.
If the requirement is to set up java_home as required by any applications like Tomcat, add the Variable name as java_home and the path requested by the application.

2. Setting Up Java Class Path or CLASSPATH in Windows
Java programmers need to know how to set up CLASSPATH on a Windows 10 PC. Class Path or CLASSPATH refers to the path containing Library JAR and ZIP files along with CLASS files. These libraries are predefined or supplied by a third party vendor to enhance the functionality of a Java Application. Software companies develop their own libraries which are packed as JAR files that can be used by different projects.
You should copy the JAR files in a particular location and mention the JAR file path a CLASSPATH while compiling and running java programs.
There are two ways to add or include a CLASSPATH.
- Using the Command Prompt (CMD) to add Class Path dynamically
- Using Environment Variables in Windows Operating System
A. Setting CLASSPATH using Command Prompt or CMD
The advantage of adding Class path in command prompt is that you can include or add different libraries for different projects. This can be achieved using -cp or -classpath options as part of JAVAC and JAVA commands.
C:\myfolder>javac -cp "c:\folder1\files\abc.jar" Hello.java

C:\myfolder>java -classpath "c:\folder1\files\abc.jar" Hello
B. Adding CLASSPATH to Windows Environment Variables
This approach is not recommended as you can not have different libraries for different projects. Libraries required for one java project may not be required for another java project. Including unnecessary libraries consume memory and affects performance. Follow the below steps to add CLASSPATH to Windows Environment Variables.
Step 1: Open Environment Variables screen as shown in the above JAVA_HOME tutorial.
Step2: Check for CLASSPATH variable Under User Variables or System Variables. If CLASSPATH variable is available, add an entry with the path of your Libraries or Class Files.
Step 3: If the CLASSPATH variable is not available, add it manually under User Variables or System Variables and then add an entry or multiple entries with Paths of your libraries or JAR files.
Step 4: Restart Windows once. Now you can access the Java Libraries added in the CLASSPATH in your Hello.java program or any other programs or any projects running on the PC.
CLASSPATH Path Rules for Adding multiple Jar and Class Files
Rule 1: You can mention the full path of a Class file or Jar file for inclusion in Class Path.
Rule 2: You can mention the path up to a directory name to include all Jar files and Class Files in that directory.
Rule 3: Take care of the order of inclusion of files as some libraries depend on other libraries to be loaded first.
Rule 4: On a Windows machine, use Semicolon (;) to separate paths. If you are using Command Prompt, use Colon (:) to separate multiple paths.
How to Check Java is Installed or Not
You can cross check whether you successfully installed Java or not using the command prompt. This check also covers whether Java Environment is setup properly or not.
Step 1: Open CMD or Command Prompt
Step 2: If you can get reply to java command, it means JRE is successfully setup for running java programs.
C:\> java
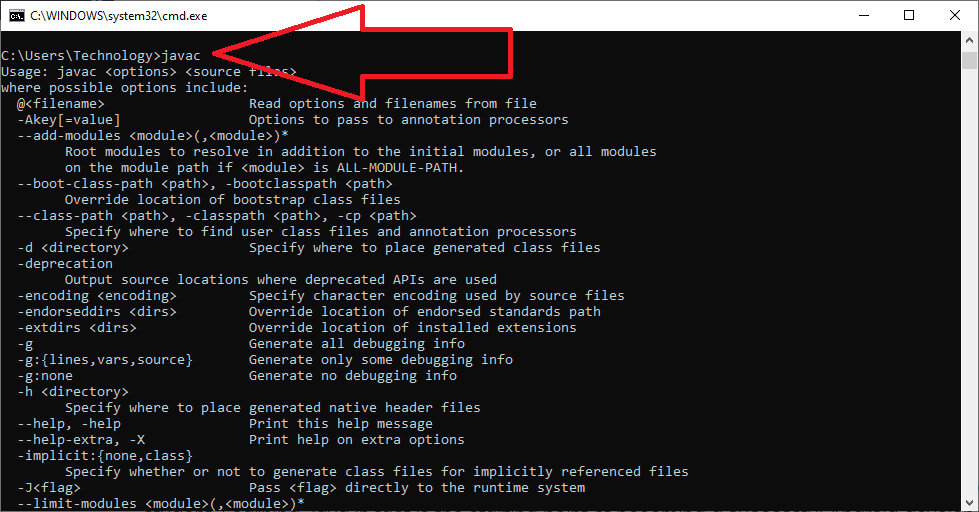
Step 3: If you can get reply to javac command, it means JDK or Java SE is successfully setup for compiling java programs. This check ensures successful setting up of JAVA_HOME path.
C:\> javac
Step 4: You can also check the installed JAVA Version using -version command.
C:\Users>javac -version
javac 10.0.2

C:\Users>java -version
java version "10.0.2" 2018-07-17
Java(TM) SE Runtime Environment 18.3 (build 10.0.2+13)
Java HotSpot(TM) 64-Bit Server VM 18.3 (build 10.0.2+13, mixed mode)
How to solve error javac is not recognized as an internal or external command
Step 1: Check whether you installed Java on the System or not by pinging 'javac' in command prompt. You should install Java SE or JDK but not JRE.
Step 2: Set up Java Home Path as explained in the above tutorial. BIN directory path should be either added to User Variables or System Variables under Environmental Variables.
Step 3: Restart CMD or Command Prompt.
Step 4: Restart Windows and ping javac again.
You can also read our good stuff articles / exams.
| C Arrays, Multidimensional Arrays and Pointers - Online Test 1 |
| C Structures and Pointers - Online Test 1 |
| C Data Types and Storage Classes Online Test 1 |
| C Functions and Pointers - Online Test 1 |