
Each Android Activity has a toolbar or Action Bar. On the Home screen, we may not see or need a Back-Button. But, on inner activities or screens, we need to show Back-Button arrow or Up button at the top-left position. Let us know how to show the Android toolbar back button, change Color and Shape in the Android studio programmatically. We try to click it and go back to the parent activity. Eventually, we solve the problem of the Not-Showing or Not-working Android Toolbar.
You can Change the Android toolbar title programmatically for convenience.
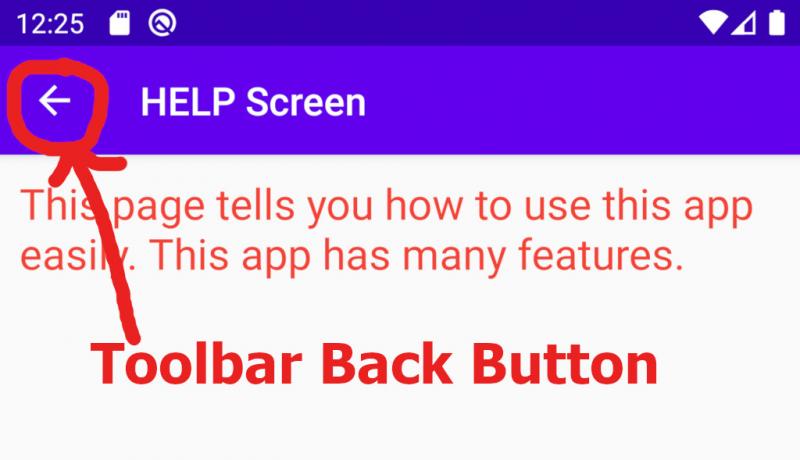
1. How to Show Android Toolbar Back Button Programmatically
Android bottom-navigation-bar allows the user to go back to the calling activity or parent activity by clicking on the left-arrow button. Another approach is showing a back-button or left-arrow on the Android Activity Toolbar. The user clicks it to go back. The purpose of showing this left-arrow is to tell the user that he is not on the Home Screen or Home Page.
Follow the below steps.
Step 1: Create a new Android Project using the "Empty Activity" Template. This creates "activity_main.xml" layout and "MainActivity.java" files.
Step 2: Create a new "Empty Activity" by right-clicking on the project-mode or android-mode. Give name as "HelpActivity". This creates an XML layout called activity_help.xml.
Step 3: In the HelpActivity.java file, put the following code to enable Android Toolbar Back Button. Here, setDisplayHomeAsUpEnabled (true) shows the back button. To make clicks or taps work on the back button, we have to use an Overridden method onOptionsItemSelected(). Also, the use of the method "finish()" actually causes the HelpActivity to finish and go back. It is a good practice to call getSupportActionBar instead of getActionBar.
public class HelpActivity extends AppCompatActivity {

    @Override
    protected void onCreate(Bundle savedInstanceState) {
        super.onCreate(savedInstanceState);
        setContentView(R.layout.activity_help);

        getSupportActionBar().setDisplayHomeAsUpEnabled(true);

    }

    @Override
    public boolean onOptionsItemSelected(MenuItem item) {
        switch (item.getItemId()) {
            case android.R.id.home:
                // todo: goto back activity from here

                finish();
                return true;

            default:
                return super.onOptionsItemSelected(item);
        }
    }
}
Step 4: Using a button or any component on the MainActivity, call the HelpActivity. Now, you can exit the Second Activity namely HelpActivity using either the Toolbar back button or Bottom Navigation Bar back button.
2. How to Change Color and Shape of Android Toolbar Back Button in Android Studio
We define a Style or Theme to change the color and shape of the Android Toolbar Back Button. We apply the newly created theme to the Toolbar element added in the Layout XML file.
Step 1: Create a Style or Theme with the below code inside styles.xml. Give the theme name as "ToolbarTheme". You should use a colored drawable resource as android:homeAsUpIndicator property value. We have used a yellow vector image created using the same Android Studio without using any outside software. If you try to change the toolbar shape and color at different times, you may not get results easily. So, combine both and create a single drawable vector image.
<style name="ToolbarTheme" parent="@style/ThemeOverlay.AppCompat.Dark">
    <item name="android:homeAsUpIndicator">@drawable/ic_fast_rewind_yellow_24dp</item>
</style>
Step 2: Use the new theme created above for the Toolbar component in our layout as below. We have used the latest Material Design Toolbar component derived from "androidx" library. You can use the older V7 or V4 AppCompat-Toolbar if you need it.
<com.google.android.material.appbar.AppBarLayout
    android:layout_width="match_parent"
    android:layout_height="wrap_content"
    android:theme="@style/AppTheme.AppBarOverlay">
    <androidx.appcompat.widget.Toolbar
        android:id="@+id/toolbarHelp"
        android:layout_width="match_parent"
        android:layout_height="?attr/actionBarSize"
        android:background="?attr/colorPrimary"
        android:theme="@style/ToolbarTheme"
        />
</com.google.android.material.appbar.AppBarLayout>
Step 3: Run the emulator to see the new Toolbar Back Button with a different shape and color. See the sample screenshot below.

3. How to Show Android Toolbar Back Button using XML Attributes
XML attributes allow us to easily add or show Android Toolbar Back Button with a single line of code. There is no need to write any Java code inside HelpActivity.java. Follow the steps below.
Step 1: Open AndroidManifest.xml file. Find the <activity> for which Toolbar back-button needs to be shown.
Step 2: Add the below line of code to the activity with an attribute "android:parentActivityName". Usually ".MainActivity" is the parent. You can change it if you want.
<activity android:name=".HelpActivity" android:label="Help Screen" android:parentActivityName=".MainActivity">
</activity>
Step 3: Specifying the parent activity name adds the Back-Button arrow and Click-action. Tapping on the back-arrow takes us to the Parent Activity i.e Home Screen.
This is how we have successfully implemented the Android Toolbar Back Button, defined a Tap or Click action and changed its color and Shape programmatically using Android Studio.
Learn Java basics before diving into Android for fast coding and development.
It is time to share this Android Studio tutorial with your friends and colleagues.